 |
E-bike conversion |
E-bike Legal |
E-bike battery |
E-bike electrics |
Side stand |
Steering damper |
Bike tyres |
Electric m/c |
Electrically Assisted Pedal Cycles. Converting an existing bike using the Bafang BBS01 Mid-Drive kit
Installation, gear-ratio optimisation, and review.
by David Knight
Click image to view enlarged in a new window.
The terms "Electrically Assisted Pedal Cycle (EAPC)", "Pedelec" and "e-bike", can have various meanings; but the most common, and indeed the most useful, definition is: 'A bike that provides the rider with a degree of electrical assistance, but is regarded in law as a pedal cycle.' This means that the e-bike of common usage can be ridden without registration plates, road tax, roadworthiness certificate (MOT) and insurance (at time of writing), and the rider does not need a driving license or a type-approved helmet. In the UK (excluding Northern Ireland), the basic requirements for such an exemption are that it must be possible to propel the vehicle using pedals, the electrical assistance must stop when the speed reaches 15.6 mph (25 km/h), and the motor power must not exceed 250 Watts. In the UK also, there is a minimum age requirement of 14 years.
People from all walks of life seem to like the idea of owning an e-bike; but there is a particular attraction for those who would like to do a lot more cycling but must realistically admit that they are never going to achieve the necessary level of fitness. Such is the case for the author, who underwent an operation for a replacement aortic valve in 2012, has some permanent heart muscle damage as a consequence of the valve failure, and is separated from his local town (Ottery St Mary) by a 1.2 mile (1.9 km) long downhill stretch with a height difference of about 90 m. Thus the road I most need to use has an average gradient of around 1/20 (i.e., 5%). Going down to Ottery is therefore no problem, but coming back again without stopping to rest several times is a potentially life-threatening experience. I notice also, that my perfectly able-bodied neighbours don't like cycling up the hill either, and show a general preference for 4×4s.
There are two routes to owning an e-bike. Such a vehicle can be bought outright for the price of a fairly good second-hand car; or for those who might question the sense of paying thousands of UK£ for a push-bike with a battery and a 1/3 horsepower electric motor, it is possible to convert an existing bike. In the matter of conversions also, there are two principal choices; that of fitting a motorised wheel, or that of motorising the pedal-drive system; the latter being known as a Mid-Drive or M-Drive conversion. The motorised wheel option seems to have little to recommend it for people who live in hilly terrain or want to go off-road, because it lacks any method for changing the gearing ratio. The most straightforward approach also involves the front wheel, and so will make the steering heavy. So it seems that, for the fiscally prudent hill dweller not afraid of bike maintenance, the M-Drive is an obvious solution.
The huge advantage of an M-Drive system is that it provides electrical assistance directly to the pedals. This means that it operates through the existing rear gear-changing system and so, in principle, can provide high torque when configured with front and rear sprockets having suitable numbers of teeth. Thus diverse mobility requirements can be accommodated, but that does not necessarily mean that you will be supplied with the right ratios at the outset. It is also the case that an M-drive kit will require removal of the front dérailleur, if provided, generally eliminating the small chainwheels with high mechanical advantage.
At this point, assuming that you decide not to break the law (advisable, see legal info); a good choice of M-Drive system is the well-designed and reliable Bafang 8Fun BBS01 (or one of the various re-branded versions of it). When this project started, the BBS01 was practically the only road-legal choice; but there are now other options from companies such as Kunray (generally available via Ali Express).
Note, incidentally, that I have received correspondence pointing-out that the e-bike building experiments described here are beyond the capabilities of most people. I learned a lot about bike maintenance in the 1960s, as an impoverished schoolkid; and I started to learn about electrics and electronics at the same time, due to an interest in science and Amateur Radio. I recognise, of course, that few people will have such a background; but there are at least two ways in which you can read this article. If you don't fancy the engineering work, you can nevertheless take stock of the things I tried and the configurations that gave the best results. You might then consider getting a friendly local bike shop to install and adjust the various components, and still pay a lot less than you would for a branded commercial solution.
Some initial thoughts on gearing and choice of bike.
A straightforward approach to carrying out an e-bike conversion is to start with a modern mid-priced bike that uses a cassette-type rear dérailleur system; a cassette being a set of sprockets designed to fit onto a splined freewheel hub. This allows cogs to be changed easily and inexpensively during maintenance and to optimise gear ratios. Another possibility would be to put together an e-bike that uses rear-wheel hub gears, but obtaining a wide range of ratios is then going to be expensive. Adding a motor unit and battery will add about 8 kg to the overall weight, so the chosen bike should be a tough workhorse not a lightweight thoroughbred.
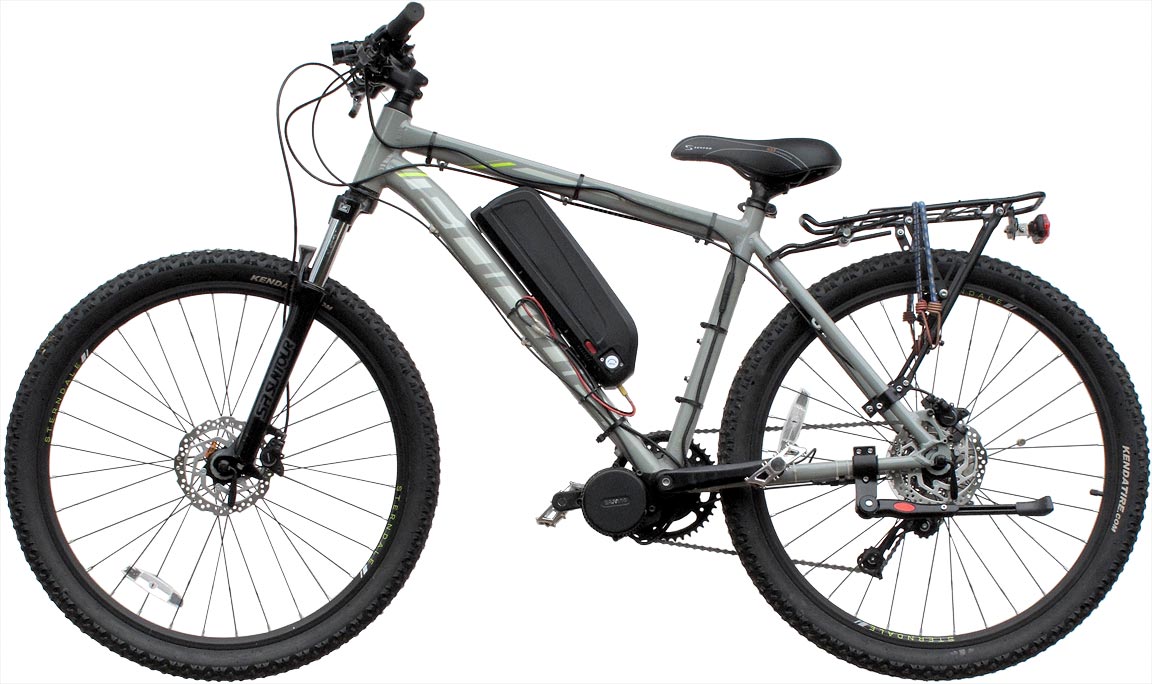
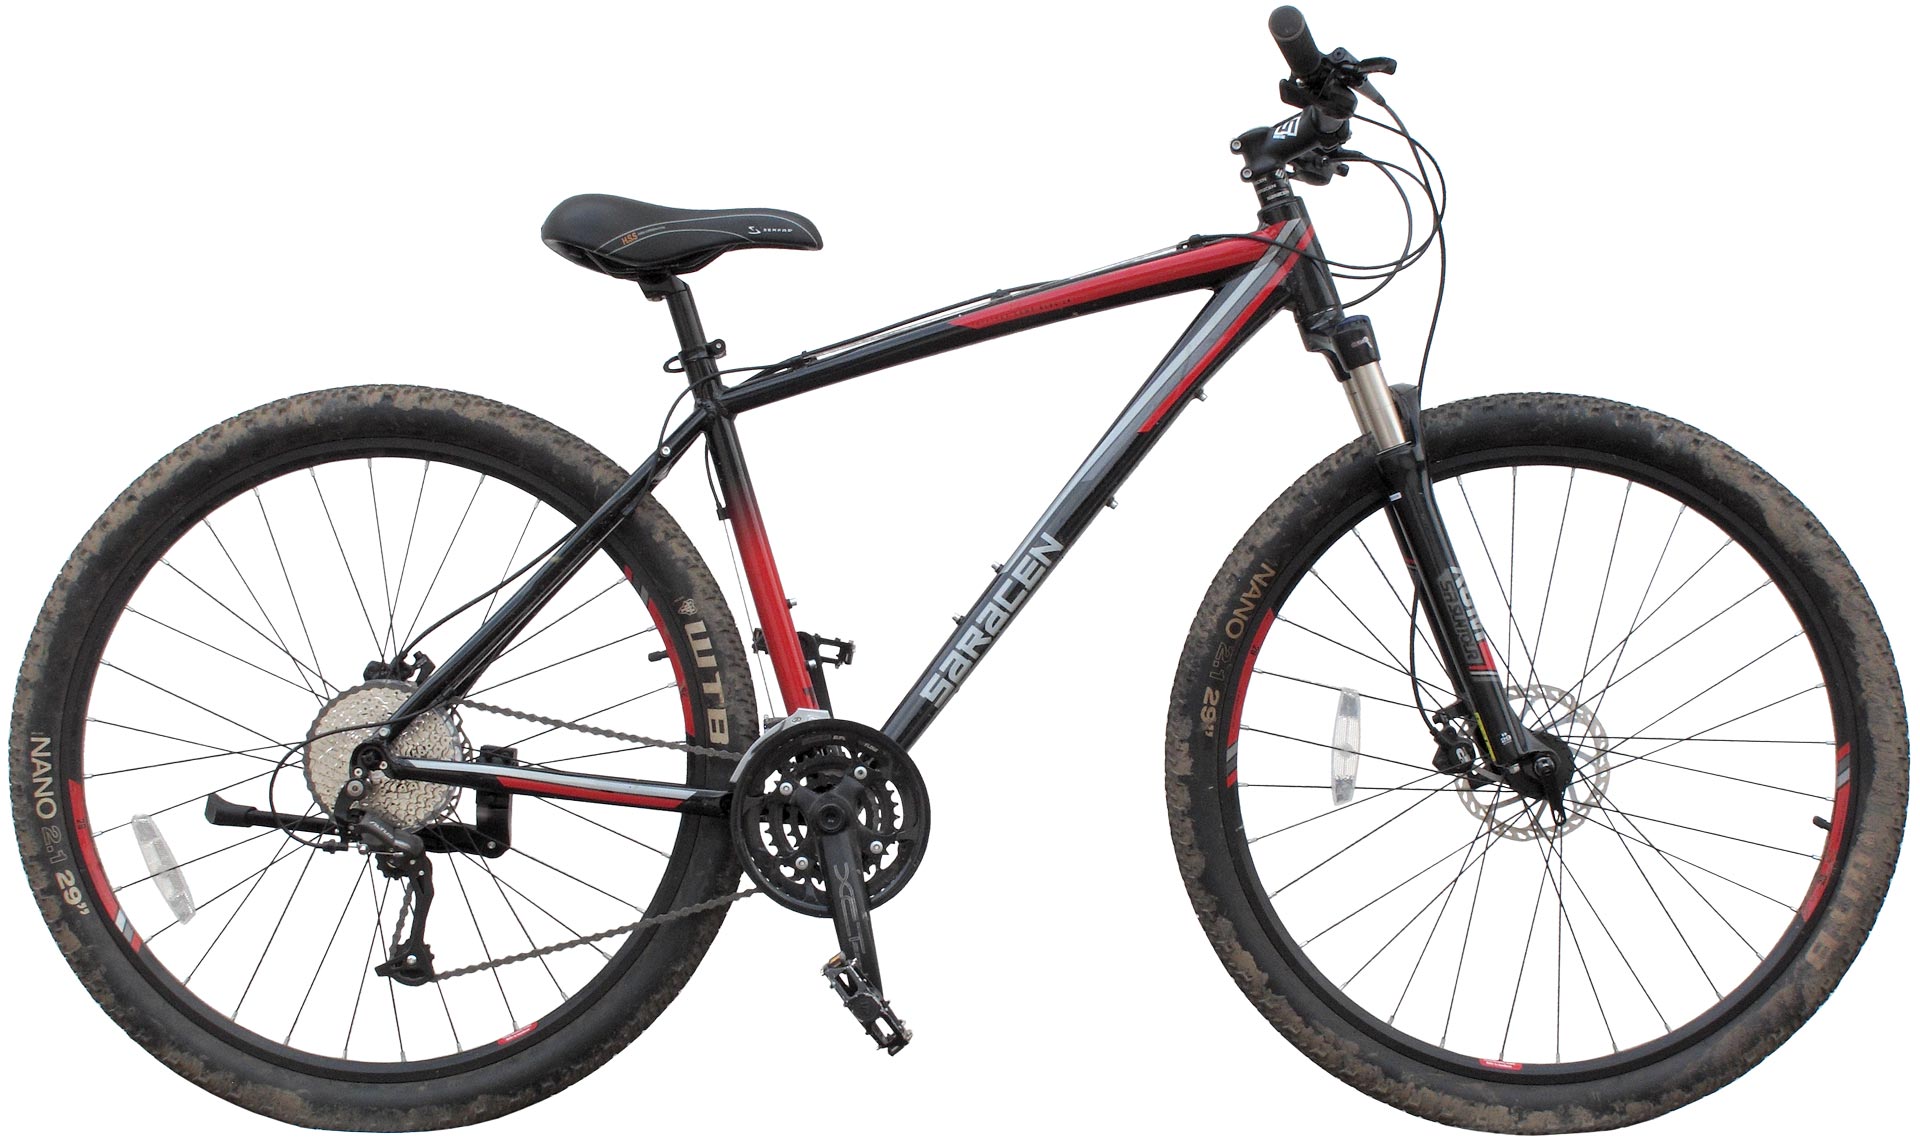
I own a Saracen Tufftrax Comp Disc 29 hard-tail mountain bike (2012-2017 model), which, as the name implies, has 29" wheels This came with an 11-32 tooth Shimano 9-speed rear dérailleur cassette, and a triple front chainwheel with a choice of 44, 32 or 22 teeth (i.e., a 3×9 drivetrain). The 44T chainwheel is for going fast on good roads, and has proved to be of little use in the cramped streets of Ottery and the pot-holed single-track lanes through which my house communicates. Also, it has to be said that, since heart surgery, I don't have the stamina needed to make the bike go fast in top gear; and the fitting of a mechanical aortic valve requires that I take Warfarin to keep my blood-clotting time (INR) between 2 and 3 times that of a normal person. I therefore cycle defensively, and usually pull to the side and stop when I meet other vehicles in the lanes. Given the dire consequences of falling off, I also don't go particularly fast downhill; and it follows that I would barely notice if I didn't have the 44T chainwheel. This was of concern because the fitting of a Bafang BBS01 drive involves discarding the front dérailleur and fitting a single front chainwheel, with options of either 44, 46 or 48 teeth using Bafang-supplied parts. That would put the bike permanently into my top front gear or even higher; and I find it hard to get going from standstill in 44/32 (1.375:1). Changing to a 12-36T mountain bike (MtB) cassette would offer 44/36 = 1.22:1 with the smallest Bafang chainwheel, which is somewhat better, and of course, the whole point is that the motor supplements the rider's strength; but the bike essentially becomes unusable once the power is off.
As an alternative to fitting the supplied front chainwheel, people also manufacture adapters (known as 'spiders') that can be used to mount non-Bafang front chainwheels. These are available for bolt-circle diameters (BCDs) of 104, 110 and 130 mm. The problem here however is that the standard Bafang chainwheel is dished to bring the chainline towards the body of the motor. The use of a smaller chainwheel therefore does not allow such a good chainline; introducing the possibility of dérailleur adjustment issues and increased wear. On the other hand, a 104 mm BCD spider allows the use of a 32T chainwheel, and 32/36 gives a very acceptable bottom ratio of 0.89:1.
A further set of alternatives is provided by various 3rd party manufacturers who make Bafang compatible chainwheels. Some of these sprockets are flat, and some are dished to improve the chainline. Exact details of the design can however be hard to obtain from the online information.
The difficulty, for me, at this point was the accumulation of unanswerable questions. This eventually led me to the decision that I would not start by experimenting on my perfectly serviceable Saracen 29, and that I would instead get hold of another bike to use as a test-rig. A straightforward and harmless modification for the Saracen however, was to fit a 12-36T rear cassette and get a bit more mileage out of the 44T front chainwheel. This also gave a somewhat balance-challenging bottom ratio of 22/36 = 0.61:1, which was not particularly practical for ordinary roads, but was good for cycling on the steep tracks found in this part of the world. Note that when fitting a casette with larger sprockets, it will often be necessary to purchase a longer chain.
Once I had built my first e-bike, I soon got 'round to converting the Saracen to make a second one. That was done because the first conversion was very successful, and it turns out that able bodied (but not particularly athletic) cyclists on ordinary bikes can't easily keep up on hilly terrain with a heart patient on a well-fettled electric bike. I therefore built the second bike so that others could come cycling with me.
Apart from gearing considerations; while changing the rear cassette on the Saracen, and thinking about the possibility of carrying-out an e-bike conversion, I become aware of an annoying issue that might be worth considering when selecting a bike. The Saracen has bare sections in its gear shifter cables. For both shifters, a short length of Bowden-cable outer is used to get from the handlebars to a lug on the upper side of the top frame-tube. A bare steel cable then goes from this point to a lug just in front of the saddle-post. Then, for the front dérailleur, a length of cable-outer is used to get around the corner to a lug on the down-tube to the bottom bracket. For the rear dérailleur, a length of outer goes to another lug on the rear fork, and a bare cable goes to the botton of the fork and back into an outer for attachment to the shift mechanism.
I had been aware of the practical downsides of this shifter arrangement for some time: it precludes attaching anything to the top tube, it prevents the bike from being clamped securely onto a bike servicing stand for adjustment, and it prevents the fitting of a universal luggage rack. I had however previously not bothered to do anything about it. Allegedly it reduces weight; but that there might be an advantage of losing a few short lengths of cable-outer and then having to weld a bunch of lugs onto the frame seems implausible. It has also been said that it might reduce friction; but while having to cycle through puddles is practically unheard-of in sunny England, there will eventually come a point when the ingress of muddy water will make itself apparent.
For an e-bike conversion, any bare shifter-cable sections are best eliminated. The front down tube is needed for the battery pack (and possibly a steering damper), electrical cables run along the top tube, and existing attachment points are used up and you'll want to create new ones. Mercifully, the front dérailleur is removed completely, and that solves half the problem. For the rear dérailleur however, you'll need to run a single-piece Bowden-cable from the rear mechanism to the handlebars with reasonably low curvature. You'll also need the tools and parts for making-up Bowden cables, and the dérailleur will need to be readjusted afterwards. None of this is difficult, but a layer of messing around might be avoided if you're planning on buying a new bike.
Versatility.
29ers are for tall people. I am 1.80 m tall and my son Steve is 1.98 m. Both of us can use the Saracen in comfort; but the minimum saddle height does not suit other members of our family or anyone else under about 1.75 m. One consideration when carrying out an electric bike conversion however is that others will want to have a go on it; and if adopters of the technology can allow that, it promises to change attitudes towards cycling (and make the roads safer to boot). I keep reading articles saying that e-bikes are a form of cheating; as if cycling only attains validity by being exhausting and causing the practitioner to need a shower and a change of clothes. The truth of the matter is that cycling isn't practical for the majority of people, because you don't arrive fit to work unless it was walking distance anyway; so cycle rides tend to be rare, and tend to be arranged so that they end at home. Thus most people never attain the stamina and skill required to make cycling enjoyable and safe; and a huge barrier to uptake exists.
With the ideas outlined above beginning to form, but not yet fully realised, my son Steve and I went to the cycle shop from which we had bought our existing mountain bikes a few years earlier. I must admit, I had been thinking of getting another 29er; but Steve made the point that none of our other family members would be able to ride it, and it occurred to me that having smaller wheels results in greater mechanical advantage for a given drive-train. So, after much discussion, I bought a Forme Sterndale 1.0 mountain bike with 27.5" wheels; which, albeit another hard-tail, conforms to what I consider to be a basic modern user requirement, which is that of having adjustable front suspension and hydraulic disk brakes. The bike had a 9-speed 11-32T Shimano Hyperglide (HG) cassette fitted originally; but that was swapped for a 12-36T, and the slim saddle was replaced with a more testicle-friendly gel model for a modest extra cost. I was also given a couple of secondhand Shimano 32T 104 BCD steel middle chainwheels for some low-ratio experiments (see below). The Sterndale came with a triple front chainwheel and dérailleur, which obviously had to be removed for the electric conversion, and it is worth noting that the middle sprocket from such redundant assemblies is another possible source of 104 BCD chainwheels.
A ride on the Sterndale before starting to work on it confirmed that the extra mechanical advantage (18.6%) given by the 12-36T MtB cassette and the 27.5" wheels was very noticeable in comparison to the Saracen's original 11-32T and 29" setup.
Twist & Go.
The Bafang motor has an internal freewheel ratchet mechanism in addition to the freewheel hub at the rear wheel. This means that the motor can propel the bike while the pedals stay still, and the facility to connect a throttle control (accelerator) is provided accordingly.
Having a hand throttle or 'Twist & Go' facility on an e-bike is both convenient and a considerable safety advantage. It permits the bike to pull-away without wobbling at busy road junctions, in crowded traffic situations, and when there are pedestrians around. It is also particularly useful in getting going again when you have been forced to stop suddenly without time to change down. There is however, a legal peculiarity in relation to this matter: which is that newly manufactured e-bikes require Government Type-Approval if they are to have a Twist & Go control. The result is that many commercial e-bikes don't have the facility. Conversions carried out on bikes that have previously been used on the public roads are however exempt from the Type-Approval requirement (see legal info).
The upshot is that, if you intend to fit a throttle, you must convert a bike that has been used previously. If you were to buy a frame and build an e-bike from scratch, thereby sidestepping the expense of discarding a perfectly good crank-set and front dérailleur, that action would constitute manufacturing and would result in a machine that requires Type Approval. The matter might seem unprovable of course, but there is always an audit trail if someone wants to cause you legal difficulties.
Installing a Bafang M-Drive on an existing bike.
Presuming that you have a bike that you want to convert, and that you have a Mid-Drive kit waiting to be installed; the first job is to remove the front dérailleur (if present). This is the point at which most online commentators assume that what they needed to do is universal, and some actually recommend that you destroy parts of the shift mechanism in order to get the chain off. You don't need to destroy anything, but you do need to own chain-splitting tools and Quick-Links, even if you don't require them here.
In some cases there will be a screw on the chain shifter that can be taken out, enabling the mechanism to be opened-up and removed without splitting the chain. On the recently manufactured Shimano shifter on my Sterndale however, there was a place for the screw in the pressing, but the two parts had simply been welded together. Thus I needed to remove the chain, but I found that it had been supplied with a Quick Link already fitted. If you read about Quick Links online, people say that they are unreliable. I asked about this at the cycle shop, and was told that such links are perfectly reliable; and the practice of pushing chain pins back in with a chain splitter is the greater source of breakages. To open a Quick Link requires a set of special pliers. Some Quick Link pliers can also close the link (i.e., force the rollers apart), but this operation is also fairly easy to accomplish by assembling the link and tugging the chain. If you part the chain using a link extractor and then fit a Quick Link, note that the links come in different widths (8, 9, 10 or 11 speed) depending on the number of sprockets on the rear cassette, and there are both single-use and reusable types.
The next operation is to remove the pedals. It's best to do this while the cranks are still on the bike, otherwise you will need to hold each crank in a vice and risk scratching it. A 15 mm open-ended spanner is usually required. The pedal on the left side of the bike (the side opposite the chain side) has a left-hand thread.
Removal of the cranks from low-end and mid-price bikes requires a special tool known as a 'crank puller'. Before buying a crank puller, you need to take out a retaining bolt on the crank-set you intend to detach and have a look at it. The Bafang 8Fun uses a 'standard' old-fashioned square-taper fitting, but more modern bikes will often have a splined crank. Shimano Octalink® cranks (as the name implies) have an 8-lobed spline, and Isis® cranks have 10 lobes (and there may be others). The splined cranks can only be removed with a standard crank puller if there is an additional anvil piece to fit into the end of the crankshaft. I got caught-out by this, but I have a lathe, so I was able to make an adapter out of a piece of mild-steel bar in about 10 minutes. The item I made is functionally identical to the Shimano TL-FC15 (see list of tools at the end of the article).

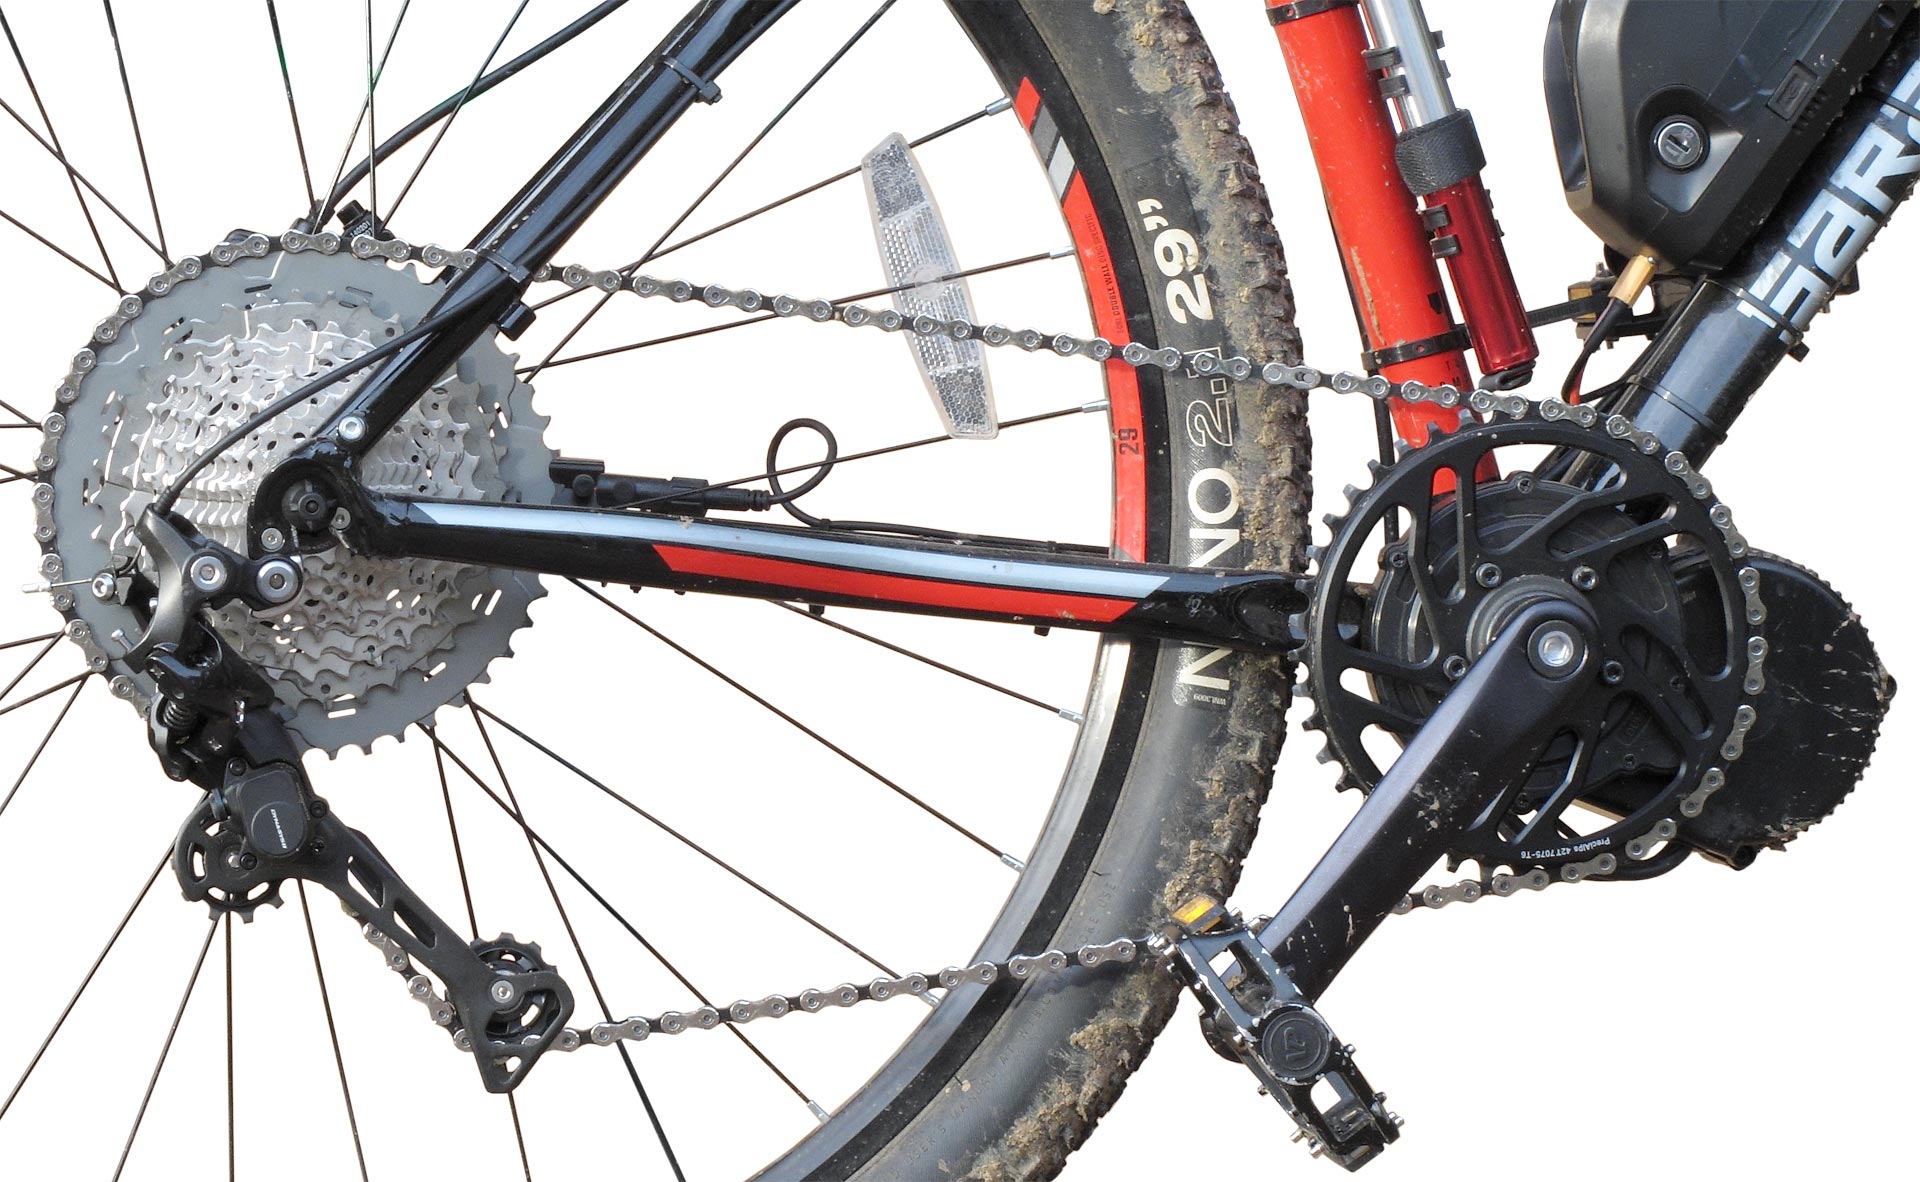
Shimano Octalink sealed crankshaft unit with crank puller and adapter. The top-hat shaped piece fits into the end of the crankshaft, allowing the bolt in the crank puller to push against it.
Once the cranks have been removed, it's time to remove the bottom bracket. This requires a special tool with a 20-lobed spline that fits into the retaining nuts on either side. This is the point at which you have an opportunity to ruin the nuts, destroy the tool, skin your knuckles, and write a venomous feedback article casting doubt on the tool-seller's parentage. Alternatively, you might try using the thing properly.
You will notice that the tool has a hexagonal part allowing it to be turned using a wrench or spanner, as well as a socket for a ½" ratchet wrench. There is a very good reason why it has both. It is usual to see explanations of how to remove a bottom bracket in which the commentator snaps the tool onto a ratchet drive and (supposedly) turns the nut. That might work, or it might not; but the second possibility is extremely likely. If the nut has been in place for any length of time, it will probably have encountered its fair share of rain and mud.
Assuming that you do not own a pneumatic impact wrench, a reasonably stress-free way of loosening the nut is to hold the tool in place using a G-clamp, with a block of wood on the opposite side to protect the paint or the protruding crankshaft (see illustration below). An open-ended spanner or wrench can then be placed on the hexagonal part; and a sharp, but not particularly hard, tap on the spanner with a soft mallet should free the nut. What happens here is that the shock of tapping the wrench shatters the crystalline structure of any rust, dirt or adhesive in the thread. The G-clamp can then be removed, and the nut can be unscrewed using a ratchet drive.
If using an open-ended spanner doesn't work; it is possible to insert a 2 ft breaker bar into the tool and hold it into the bottom bracket with a G-clamp as before, but with a second block of wood to protect the breaker. It takes two people to hold this arrangement together while doing-up the clamp, but it does loosen the most belligerent of nuts.

Holding the bottom bracket tool in place with a G-clamp while persuading the nut to turn. The sprocket-side nut has a left-hand thread. If the nut is very stiff, use a proper open-ended spanner (24 mm or 15/16"), not an adjustable.
Another reason why people destroy the bottom bracket tool is that the nut on the sprocket side has a left-hand thread. It needs to be turned clockwise to undo it.
Note incidentally that, for the Shimano Octalink and other sealed crankshaft units, it is convenient to remove the drive-side nut first. That withdraws the complete shaft and bearing assembly. The nut on the other side is merely a sleeve to keep the shaft straight in the bottom bracket.
Once you have removed the crankshaft and cleared the bottom bracket without wrecking anything or injuring yourself, you are free to install the Mid-Drive motor unit. Furthermore, if the author's experience is anything to go by, the procedure is then quite closely related to the information given in the various versions of the instruction manual. That all depends however on the bottom bracket being "standard", which means that it must measure between 68 and 73 mm from one side to the other. You can estimate this approximately by waving a ruler in its general direction before the crankshaft and pedals have been removed.
The thread around the crankshaft on the Bafang motor unit is M33×1.5. The motor is held into the bottom bracket by a hard steel M33 castellated round-nut, which is then covered over by a splined aluminium-alloy locknut. The outer nut has a valance to hide the castellations of the inner one. It can be difficult to get the steel nut as tight as it needs to be to stay done up for a long time, and a good quality C-spanner (hook wrench) is needed. Also, the valanced locknut has to be unscrewed if you want to check the tightness, and this requires removal of the pedal. Early versions of the 8Fun just had two castellated nuts, this being a less attractive but more secure arrangement. Hard steel castellated nuts can be ordered online (on ebay, for example, try "round castle locknut"). Note that stainless steel is also hard and has the added benefit of corrosion resistance.

Large
stainless steel castle nut with the Bafang supplied nut used as locknut.
I actually bought a BBS01 kit with a 46T chainwheel, but then bought a 44T chainwheel separately as an afterthought. Both of these sprockets came with a plastic chainguard, the 46T version having a larger diameter than the 44T version. Both guards however have the same hole circle diameter for the fastening screws, so the large one can be used with the smaller sprocket if so desired. I first commissioned the bike with a guard fitted, but later left it off on the basis that flared trousers went out of fashion over 40 years ago. It might conceivably prevent the chain from jumping off on the outside on rough terrain, but it also prevents access to the five Allen screws that hold the chainwheel to the motor shaft, making it difficult to check tightness or swap chainwheels. Being plastic, the chainwheel cover is of little use as a bashguard; and a sprocket guard is in any case not sufficient to protect the BBS01 motor because there are three electrical cables coming out of the bottom of that. Riding without grounding the motor housing is therefore advisable unless some kind of engine guard plate (Motorschutzblech) is devised. Such a guard is available for the BBSHD, but there are no obvious attachment points on the BBS01/02, which means that it would have to attach to the bike frame.
The Bafang motor unit has square tapers on its crankshaft. The subject of fitting crank arms to such tapers has generated considerable and sometimes heated discussion in the numerous web fora; all of which can be summarised fairly succinctly by saying that no one seems to know what to do. The problem is that; while the process of doing up a bolt normally has an obvious end-point, this is not the case with bolts that draw the two parts of a taper system together. This issue is also particularly troublesome when one of the parts (the crankshaft) is made of hard steel, while the other (the pedal arm) is made of aluminium. An ordinary Allen key isn't long enough to achiveve the required tightness (NEVER us a hammer); and while a socket wrench with an Allen bit can do the job, it is impossible to decide when to stop. If the bolts are too loose; the pedal arms will creak and click, they will keep falling off, you might lose bolts on the road, and the taper fittings can be permanently damaged. If the bolts are too tight, the fittings can be permamenetly damaged, and the arms will be very difficult to remove.
Under such circumstances, there really is no alternative but to use a torque wrench. It does not however need to be one of the expensive (and uninformative) click types; and in the author's opinion, the low-cost beam-deflection indicator type is perfect for this job. The type of Allen key that fits onto a socket wrench is incidentally known in full as a "Hex Allen key bit socket". The size required for pedal crank bolts is 8mm. A ratchet 'adaptor' between the the torque wrench and the Allen bit facilitates the job considerably; but a good quality (>500 Nm rated) adapter is likely to cost more than the wrench.
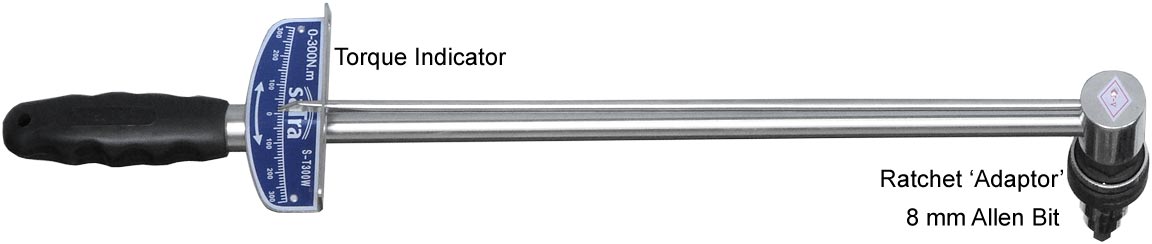
With a torque of around 40 Nm, the crank will pull slowly onto the taper. Grease doesn't make much difference. Keep going until the bolt slows down and stops. Tighten both cranks, then go for a short ride to make sure that they don't creak or click under load. If they do, tighten them a bit more. When all is well, put an ordinary 8 mm Allen key into the road toolkit, just in case, go for a longer ride, and check again. Check the tightness periodically.
Ratio tables for various chainwheel sizes and some MtB cassettes.
The ratios given in the tables below are the number of turns of the back wheel per turn of the pedal crank. To get the distance travelled or 'metre de développement' (measure of progress), multiply the ratio by πD, where D is the effective diameter of the back wheel.
Distance / cycle = measure of progress = πD × Tf / Tr
Tf = front sprocket teeth
Tr = rear sprocket teeth
D = back wheel outer diameter
If you've just upgraded from a penny-farthing and want this figure in "gear inches", leave out the π.
Gear inches = D × Tf / Tr
To convert from gear inches to progress per pedal rotation (in metres), multiply by 0.0254π = 0.0798.
The optimum penny-farthing wheel diameter for travelling on the flat was determined to be around 60", so to upgrade to a bike with (say) 27.5" wheels, you need to gear-up by a factor of 60 / 27.5 = 2.18. For 29" wheels, the gear-up factor is 60 / 29 = 2.07. This gear-up ratio of around 2 is useful to remember when perusing ratio tables, because it is the figure appropriate for shopping on the village high street (with a wicker basket full of groceries on the front). Unless it can be comfortably exceeded, the bike is going to be too low-geared for general-purpose cycling on modern roads. Ideally, for 27.5" or 29" wheels, the top ratio should be around 3.5 to 3.8 for faster roads.
The front chainwheel sizes listed below are examples of what can be fitted on a BBS01/02 M-drive conversion, 44 and 46T sizes being made by Bafang, a 38T being available as a Hallomotor aftermarket product, 42T and 36T being made by PreciAlps, and 32T being made by mounting an intermediate front sprocket on a 104 BCD spider adapter. Other sizes can also be made-up using aftermarket spiders; but the larger chainwheels can be made dished to give the best chainline, with 42T being the smallest size that can be dished in this way.
Shimano HG400 12-36T 9-speed cassette.
| selector | Rear
sprocket teeth |
Front chainwheel teeth (smallest possible dished type is 42T) | |||||
| 46 | 44 | 42 | 38 | 36 | 32 | ||
| 1 | 36 | 1.278 | 1.222 | 1.167 | 1.056 | 1.000 | 0.889 |
| 2 | 32 | 1.438 | 1.375 | 1.313 | 1.188 | 1.125 | 1.000 |
| 3 | 28 | 1.643 | 1.571 | 1.500 | 1.357 | 1.286 | 1.143 |
| 4 | 24 | 1.917 | 1.833 | 1.750 | 1.583 | 1.500 | 1.333 |
| 5 | 21 | 2.190 | 2.095 | 2.000 | 1.810 | 1.714 | 1.524 |
| 6 | 18 | 2.556 | 2.444 | 2.333 | 2.111 | 2.000 | 1.778 |
| 7 | 16 | 2.875 | 2.750 | 2.625 | 2.375 | 2.250 | 2.000 |
| 8 | 14 | 3.286 | 3.143 | 3.000 | 2.714 | 2.571 | 2.286 |
| 9 | 12 | 3.833 | 3.667 | 3.500 | 3.167 | 3.000 | 2.667 |
There are also 48T and 52T chainwheels made by Bafang, but these are intended for small-wheeled bikes, and give too high a top ratio for road use with bikes having a 12-36T cassette and 27.5" or 29" wheels (and have far too many teeth for mountain biking). A recent trend however, has been to increase the range of ratios available from the rear cassette with a view to eliminating the front dérailleur altogether. Since loss of the front changer is a matter of force majeure for e-bike builders, and front sprockets having less than 42T are flat rather than dished, these new systems are of considerable interest.
For those who like the idea of using small-wheeled bikes incidentally, note that they are only suitable for towns and cities. The UK minor road infrastructure has been allowed to disintegrate since about 2005; and the pot holes are now deep enough to wreck cars, let alone folding bikes. Anything with wheels smaller than those of a Combine Harvester can expect difficulties; but using a mountain bike and keeping a good eye on the road surface can be a workable compromise.
The table below is for the Shimano Deore XT 11-46T cassette, which has a particular advantage over some of the more exotic possibilities in that it can be retro-fitted to an existing freewheel hub. Note how its use with the PreciAlps 42T (dished) front chainwheel practically covers the entire ratio range of the table above. The change ftom 37T to 46T is large, but pedaling cadence is not particularly important in a low gear primarily intended for off-road use.
Shimano Deore XT 11-46T 11-speed cassette.
| Selector | Rear
sprocket teeth |
Front chainwheel teeth | ||||
| 52 | 48 | 46 | 44 | 42 | ||
| 1 | 46 | 1.130 | 1.043 | 1.000 | 0.957 | 0.913 |
| 2 | 37 | 1.405 | 1.297 | 1.243 | 1.189 | 1.135 |
| 3 | 32 | 1.625 | 1.500 | 1.438 | 1.375 | 1.313 |
| 4 | 28 | 1.857 | 1.714 | 1.643 | 1.571 | 1.500 |
| 5 | 24 | 2.167 | 2.000 | 1.917 | 1.833 | 1.750 |
| 6 | 21 | 2.476 | 2.286 | 2.190 | 2.095 | 2.000 |
| 7 | 19 | 2.737 | 2.526 | 2.421 | 2.316 | 2.211 |
| 8 | 17 | 3.059 | 2.826 | 2.706 | 2.588 | 2.471 |
| 9 | 15 | 3.467 | 3.200 | 3.067 | 2.933 | 2.800 |
| 10 | 13 | 4.000 | 3.692 | 3.538 | 3.384 | 3.231 |
| 11 | 11 | 4.727 | 4.364 | 4.182 | 4.000 | 3.818 |
Sunrace also make an 11-46T MtB cassette, model CSMX8 EAZ. This is Shimano compatible, but offers a more even ratio spacing, the tooth numbers being: 46, 40, 36, 32, 28, 24, 21, 18, 15, 13, 11. The Shimano and Sunrace 11-46T 11-speed offerings, combined with the PreciAlps 42T front chainring, are reviewed below, and prove to be an excellent choice for those who want to combine road and off-road capability in one drivetrain.
Another alternative for achieving a wide range of ratios is to build your own cassette out of individual sprockets. Inexpensive cassettes are often supplied either as a pair of sprocket stacks, or as a single stack plus one or more separate cogs, the stacks being held together by rivets. In some cases, the individual sprockets in a stack have their own splines for engagement with the freewheel hub, which means that the rivets can be removed. It is then possible to achieve a wide range by removing one of the smaller cogs in the series and adding a so called 'expander' 'or 'extension' sprocket at the large end to give an extra low ratio. Extension sprockets can have as many as 50 teeth, but the clean pick-up of a fully engineered cassette cannot necessarily be expected, which means that very large jumps are best avoided.
The ratio steps in the region of the removed cog can be made more even by buying new sprockets, or by mixing sprockets from several cassettes. Note however, that the smallest cog is often serrated, to make it grip against the outer retaining collar; which means that it must either be retained or replaced by another similarly serrated cog. Special lockrings that allow the small sprocket to be discarded are also available, but it is important to check compatibility.
It is also possible to mix and match sprockets from cassettes with different numbers of speeds by using spacers. A 2 mm spacer, for example, allegedly allows sprockets from 11-speed cassettes to be used in 10-speed systems (I haven't tried it). 1 mm, 1.5 mm and 1.85 mm spacers are also available, some cassettes are built using spacers, and thin shims can be made from sheet metal.
Wide-ratio cassettes, extension sprockets, and cassette modifications.
 Singletrack World: Shinano Deore
XT 11-46T 11-speed casette. Sunrace
wide-ratio MtB cassettes. Aerozine sprocket adapters.
Absolute
Black Extender Cog and 13T lockring.
Hope
Chainrings. Wolf
Toolth casette cogs. OneUp
42T sprocket. e*thirteen
extender cog.
Singletrack World: Shinano Deore
XT 11-46T 11-speed casette. Sunrace
wide-ratio MtB cassettes. Aerozine sprocket adapters.
Absolute
Black Extender Cog and 13T lockring.
Hope
Chainrings. Wolf
Toolth casette cogs. OneUp
42T sprocket. e*thirteen
extender cog. How
to adjust your dérailleur. Customising
a
Shimano HG50 cassette.
How
to adjust your dérailleur. Customising
a
Shimano HG50 cassette.
Note that very large rear sprockets can require a longer than usual dérailleur B (body) tension adjustment screw. This adjustment sets the position of the jockey wheel (upper pulley) relative to the largest sprocket, the point being that the two should be close without touching. This screw is just an M4 set screw (i.e., it is threaded all the way along its length). 'Extra long' means 25 mm thread length or greater. A grub-screw, an Allen-head, or a Phillips can be used. To avoid rusting, the material should preferably be stainless steel A2 or A4.
An alternative to fitting a longer B screw is fo fit a Wolf Tooth / Lindarets GoatLink dérailleur hanger extension. The goat metaphor relates to the idea that the extension piece enhances mountain-climbing ability. The effect is to move the jockey wheel further around the cassette and position it so that the extreme B adjustment is no longer needed. This modification is said to improve shifting performance, and the greater chain wrap will tend to reduce sprocket wear.
A commercial weakness of the Goat Link is that, while it might have taken a lot of R&D work to arrive at the design, it is just a small metal component made using a CNC machine tool. Consequently, while the genuine article can cost about UK£28 (inc. shipping) at time of writing, there are alternatives for around £4 (or £2.50 if you can wait for it to come direct from China).
When a large range of ratios is provided, it might be necessary to fit a long-cage dérailleur. The cage length is the distance between the jockey wheel and the tension pulley. In the lowest gear (largest cog), the tension pulley is is at its furthest forward, and in the highest gear (smallest cog) it is at its furthest back. A long cage permits a large range of movement.
Controls and wiring.
Where the installation manual is justifiably vague is in the matter of how to lay-out the connecting cables and fit the controls. Bikes have a great deal of variability, and all that can be said with certainty is that the job must be done in such a way that cables cannot get accidentally crushed or snagged. There are however a few specific issues worthy of comment.
I decided to fit a right-hand twist throttle, the same configuration as is used on motorcycles. I found a problem however, which is that the throttle was not compatible with the control levers for my rear dérailleur. It was simply not possible to get the shift control into a good ergonomic position relative to the hand-grip with the throttle twist-grip in between. So, it occurred to me that, since there was no-longer a front dérailleur, I should move the shifter to the left-hand side.
My first thought on this matter was that it might be possible to buy a left-hand 9-speed shifter, at which point I made the mistake of looking for information online. According to some of the web fora, this is a huge problem for disabled people who lack the full use of the right hand. The general view seemed to be that the issue is insoluble, although one suggested 'solution' was to dismantle a 3-speed shifter and get a machine shop to create a left-handed 9-speed ratchet mechanism for it. I began to form the view that I should discard the right-hand throttle and get a left-hand one; but then I had a careful look at the bike and a strange heretical thought came into my mind: 'Er. . . ., why can't I just take the shifter off the right handlebar and put it onto the left one?' Five minutes work with a couple of Allen keys and I had a left-hand rear shifter. The numbers on the indicator were upside-down, and I had to change down with my forefinger and up with my thumb; but so what? Getting used to the arrangement while out riding took a few hundred milliseconds.
Incidentally, when I eventually upgraded to a 1×11 drivetrain, the indicator on the Shimano XT M8000 trigger shifter I fitted had no numbers on it, and it was then not possible to determine that the control was on the 'wrong' side of the handlebars.
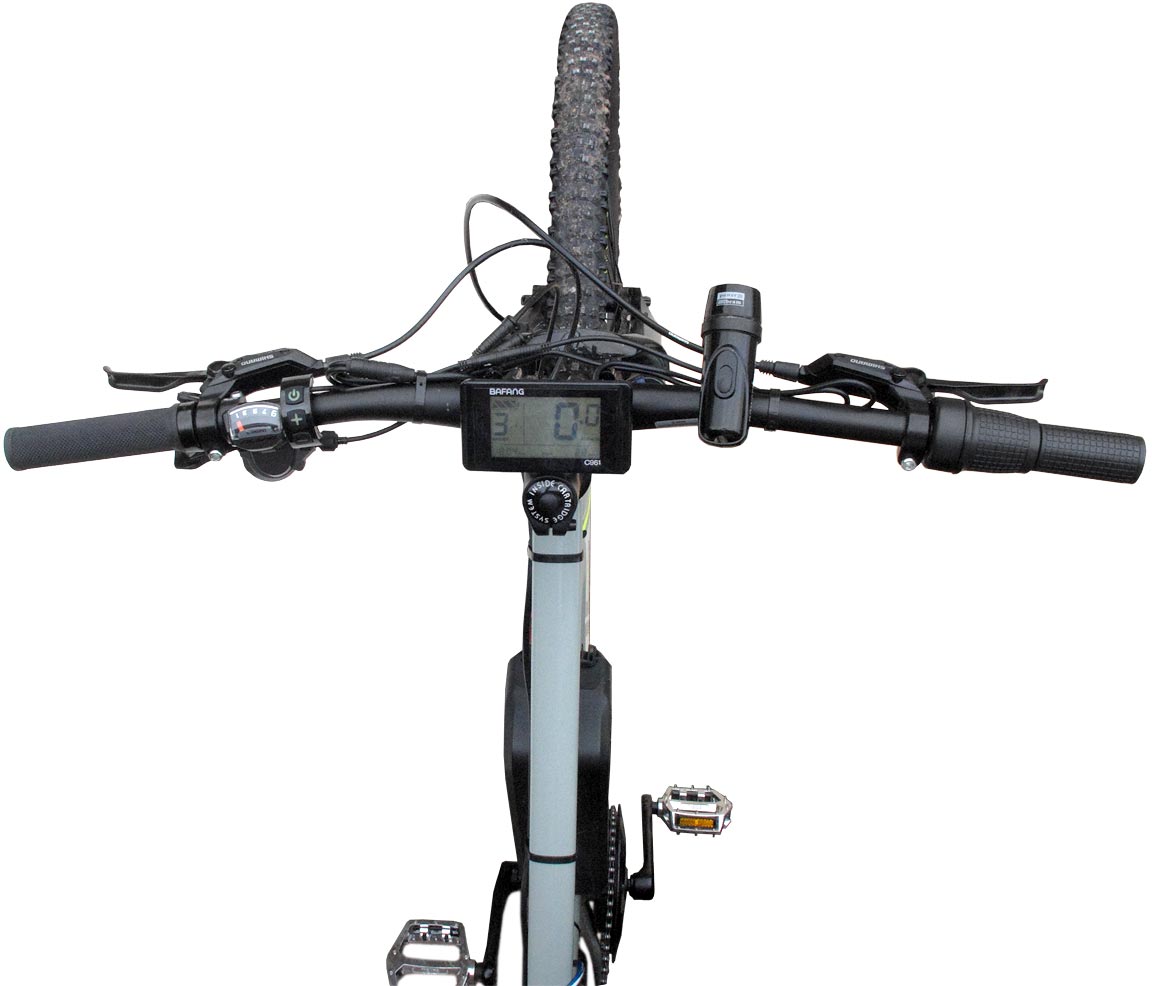
Handlebar layout
with
9-speed shifter on the left and twist throttle on the right. Notice
that the ratio indicator lies above the handlebar, rather than
sticking-out past it. If you want to fit a twist throttle, this is a
feature worth looking for when selecting a bike or a shifter, because
it gives more positioning options.
The Bafang kit is supplied with a pair of brake levers that have motor cut-off switches on them. An issue however, is that the included levers are only suitable for cable-operated brakes, they are of no use if you have hydraulic actuators, and they also cannot be used if the bike has combined brake and gear shifters. These limitations ensure that many people do not bother to install the switches (which are often said to be not strictly essential).
I felt however that there might be an advantage in retaining the kill-switch functionality, and so I ordered a pair of Bafang BBS magnetic brake-sensor switches. I presumed that these could be retro-fitted to a variety of brake actuators, a small magnet being attached to the lever arm using an adhesive pad, and the switch body being attached to the fixed part. This is a horribly crude arrangement, but I expected that it would at least allow me to evaluate the effect . A problem I found when the new switches arrived however, was that none of my brake actuators were compatible with them; and while I could see that I might be able to engineer some sort of secondary mechanism to make them work, I certainly wasn't going to be able just to stick them on. Riding without kill switches was therefore the practical solution in the short term.
Another serious downside of the crude magnetic switches is that the compass-safe distance is about 0.5 m, and there are two of them. I like to have a small compass (Suunto Clipper) mounted on the handlebars because it provides the simplest way of knowing where you are going when you're lost in the woods. Having steel bike components in the vicinity introduces small errors, but nearby magnetic switches render continuous compass navigation impossible.
Subsequent riding experience indicates that there is a worthwhile ergonomic improvement in having kill switches. This is because there can be a lag of more than a second between cessation of pedaling and the shutoff of power assistance. It is perhaps not a major safety issue, because the motor output is only 250 W and the bike brakes can absorb the short burst of surplus energy; but any enhancement in braking efficiency is always welcome.
An issue that cannot be ignored however; is that when several people ride close together, there is a definite need for brake lights. Also, most car drivers do not understand the hand-signal for slowing-down, and keeping both hands on the handlebars is anyway desirable in traffic. A brake light is therefore an obvious inclusion when a large battery is already available. Brake switches then become a necessity; and they might as well also operate the motor-kill function.
The presence of the battery, and the availability of high efficiency LED light sources, suggests that the e-bike should take advantage of the safety improvements that can be gained by having the full set of motorcycle lighting equipment; i.e., a dual beam headlight, indicators, a tail light and a brake light. In the days of tungsten lamps, such additions would have reduced the range significantly, but this is no longer the case. The provision of all of this extra equipment however requires actual engineering work, rather than the fitting of pre-manufactured parts, and it will therefore be discussed in a separate article: e-bike lighting and electrics.
Setting-up.
The setting-up procedure given in the manual is actually pretty straightforward and does not take long. There are however two peculiarities worthy of mention.
One necessary aspect of setting-up is to input the bike's wheel size. It would be good if the wheel diameter could be put in accurately, say to the nearest 0.1", but the options are limited to standard sizes. In the case of a bike with 27.5" wheels, it is necessary to put in "650b. 29" bikes can also be called 700c.
A wonderfully cryptic item in the advanced setup menu is "Level amount setting". This sets the number of increments that are available on the handlebar control when selecting the pedal-assistance level. The choice is from 2 to 9, with a factory default of 3. On one web forum, I saw a thread discussing the discovery of 'secret extra power levels', and how the performance is enhanced by going up from the default of 3 to the full 9. The only trouble is that there are no extra power levels. It's just a setting for the interval size. Three levels is a good choice, and it certainly beats the tedium of having to press the (+) button eight times to get to full power.
Bike performance with road gearing
(44T with 9sp 12-36T cassette, 27.5" wheels).
The gearing configuration I adopted initially for road use was a 44T front chainwheel with a 12-36T 9-speed rear cassette. This turned out to be an acceptable combination for town and country cycling, giving speeds in the range of 6 to 20 mph in gears 3 - 7, the ability to reach 25 - 30 mph in gear 9, and the ability to pull away on the hand throttle on uphill gradients a little in excess of 10% in gear 1. The Bafang dished chainwheel gave a chainline exactly parallel to the frame-line in gear 5, which is ideal. Dérailleur changes were smooth, provided that the drive was slackened-off a little (just as in normal cycling); and there seemed to be no real need for the gear-change sensing system provided with some of the more exotic versions of the M-drive.
In order to understand the effect of motor assistance, it is useful to be aware that a normal cyclist (i.e., someone who is not an athlete) can produce an output of 100 - 200 Watts for fairly long periods, and an output of 400 - 500 W in short bursts for going up hills or hard acceleration. An additional 250 W from the electric motor therefore makes climbing hills seem like traveling on the flat. In my case, having limited cardiac output, I can happily produce the 100 - 200 W needed for prolonged periods of level cycling, but the 400 - 500 W needed for steep hills is beyond me. Add the 250 W from the BBS01, and I get 450 W, which means that typical road hills no longer present a problem. If I pedalled moderately hard, I found I could get up the 5% (average) hill from Ottery to my house at around 11 mph in gears 3 - 5, without any need to take a rest. I also found that I could get up the hill on the throttle, without any pedaling at all, at around 6 mph in gear 1. It is of course tedious to go so slowly on a paved road, but it does give me the reassurance that I can still make it home even when I am completely exhausted. Incidentally, the fact that it is fun to pedal within the physical capabilities of the rider makes using the e-bike into an excellent form of exercise.
The way in which the motor unit provides assistance to the rider is initially somewhat strange, but getting used to it is not difficult. As set-up for use on British roads (assistance stops at 15.6 mph), motor output is at its greatest when the rider pedals slowly, and decreases progressively as the speed climbs towards the assistance limit. This gives the curious effect that assistance can be increased by changing up when going uphill. The provision of a freewheel ratchet in the motor unit also permits what I call 'faux pedaling', which is where the act of turning the pedals too slowly to lock the ratchet and propel the bike, causes the motor to propel the bike instead. This gives onlookers the false impression that you are doing some work, even though you are actually getting a completely free ride.
I have so far not managed to exhaust the battery before recharging it; but with moderate pedalling, I would estimate the range to be in the region of 40 to 60 miles.
Low ratio gearing using small front chainwheel
(32T with 9sp 12-36T cassette, 27.5" wheels).
For my first hill-climbing and off-road cycling experiments, I fitted a Shimano 32T intermediate front sprocket to a 104 mm BCD spider adapter from RisunMotor (also avalable from Hallomotor and ConhisMotor). Strictly, the spider was designed for chainwheels of 34T and greater, but being made from hard stainless steel, it was possible to grind it down (using an ordinary workshop tool grinder) until it just cleared the chain on a 32T sprocket.
After-market spiders with 104 mm BCD are available for the BBS01/02. Here, a Shimano 32T intermediate front sprocket is attached to a Hallomotor stainless steel spider adapter. A spacer of about 0.9 mm is required to prevent the chainwheel bolts from rubbing on the motor housing. The spacer is easily made from a piece of 20 SWG aluminium sheet (starting by laying the spider on top and marking the holes with a scriber).
Here a 32T Shimano sprocket is mounted on an aluminium 104BCD spider. As is the case with the steel spider, this one is intended for sprockets of 34T and larger, and so requires some filing to make it clear the chain (do not try to shape aluminium using a workshop grinder, it will clog the stone). A 0.9 mm spacer is required between the hub and the spider, as for the steel version.
The 32T front sprocket fitted to a bike with a 12-36 cassette gives a lowest ratio of 32/36 = 0.89 turns of the back wheel per turn of the crank. This is very roughly the same as changing down by a further two gears relative to the ratios available with the 44T front sprocket. It gives a bike with 27.5" wheels the ability to pull-away uphill on the throttle on a 20% gradient (1/5).
The disadvantage of the small front chainwheel is that it lacks the dish-shape of the standard Bafang sprocket and so gives the best chain-line in gears 7 and 8. The Shimano HG sprockets however have a tooth profile and shifting ramps that permit them to be used with a fairly severe degree of misalignment, and this allows the lowest ratio to be used reasonaly successfully. One downside is that the chain tends to climb down the cassette if the bike is wheeled backwards in gears 1 or 2. That situation is usually avoidable however, because gear 3 is about the same as the lowest required road ratio. Fortunately, the additional freewheel hub in the Bafang motor prevents chain climb-down on backpedalling. Critical setting of the dérailleur adjustments is necessary to avoid clicking and grumbling when climbing very steep gradients, and the drive sounds noisy under high loads. Fairly rapid wear is to be expected.
Overall, the 32T front chainwheel is too small for use on the ordinary roads. Going downhill, it is impossible to pedal fast enough to catch-up with it, even in gear 9; so freewheeling is the order of the day. Going uphill, there is not much cause to use the lower ratios, but the bike in this configuration is nevertheless serviceable if somewhat slow.
From an engineering point of view, I must also say that I hated the arrangement and could not wait to get rid of it. The drivetrain sounded very unhappy in the lowest ratios, and I did not fancy the idea of going too far away from home.
 PreciAlps Narrow-Wide
dished chainring
PreciAlps Narrow-Wide
dished chainring
(42T with 9sp 12-36T cassette, 27.5" wheels).
The narrow-wide chainring is a wonderful invention; and once you realise what it is, it is difficult not to want one. Since normal bike chains have alternating inner and outer links, and must have the same number of each (provided that there are no half-links); a chainwheel can have alternating wide and narrow teeth, provided that the total number of teeth is even. This gives a dramatic increase in the strength of the sprocket for a given material type, allowing hard aluminium alloys to out-perform steel. This profile cannot be used for the cogs in dérallieur changer assemblies, because the wide and narrow teeth must be matched respectively with outer and inner links before the chain will drop into place. It is however still perfectly possible to re-fit a chain on a narrow-wide sprocket in pitch darkness, because it won't go on unless it is properly positioned.
Strength is also not the only or even the main advantage. The chain mates perfectly with the narrow-wide structure, and this reduces the side-to side movements that cause noise and wear and can sometimes trigger the chain to jump off when going over rough ground. Hence, the N-W profile is becoming increasingly common on the front chainwheel of high-performance 1×N drivetrains.
When fitting a narrow-wide chainwheel, note that while there should be no half-links in a system having a tension arm, it is important to be sure that there definitely aren't. Also, conversely, if you decide to use a narrow-wide chainwheel in a single-speed system or a system having hub gears, you might need to use a tension arm in order to establish the correct chain length without using a half-link.
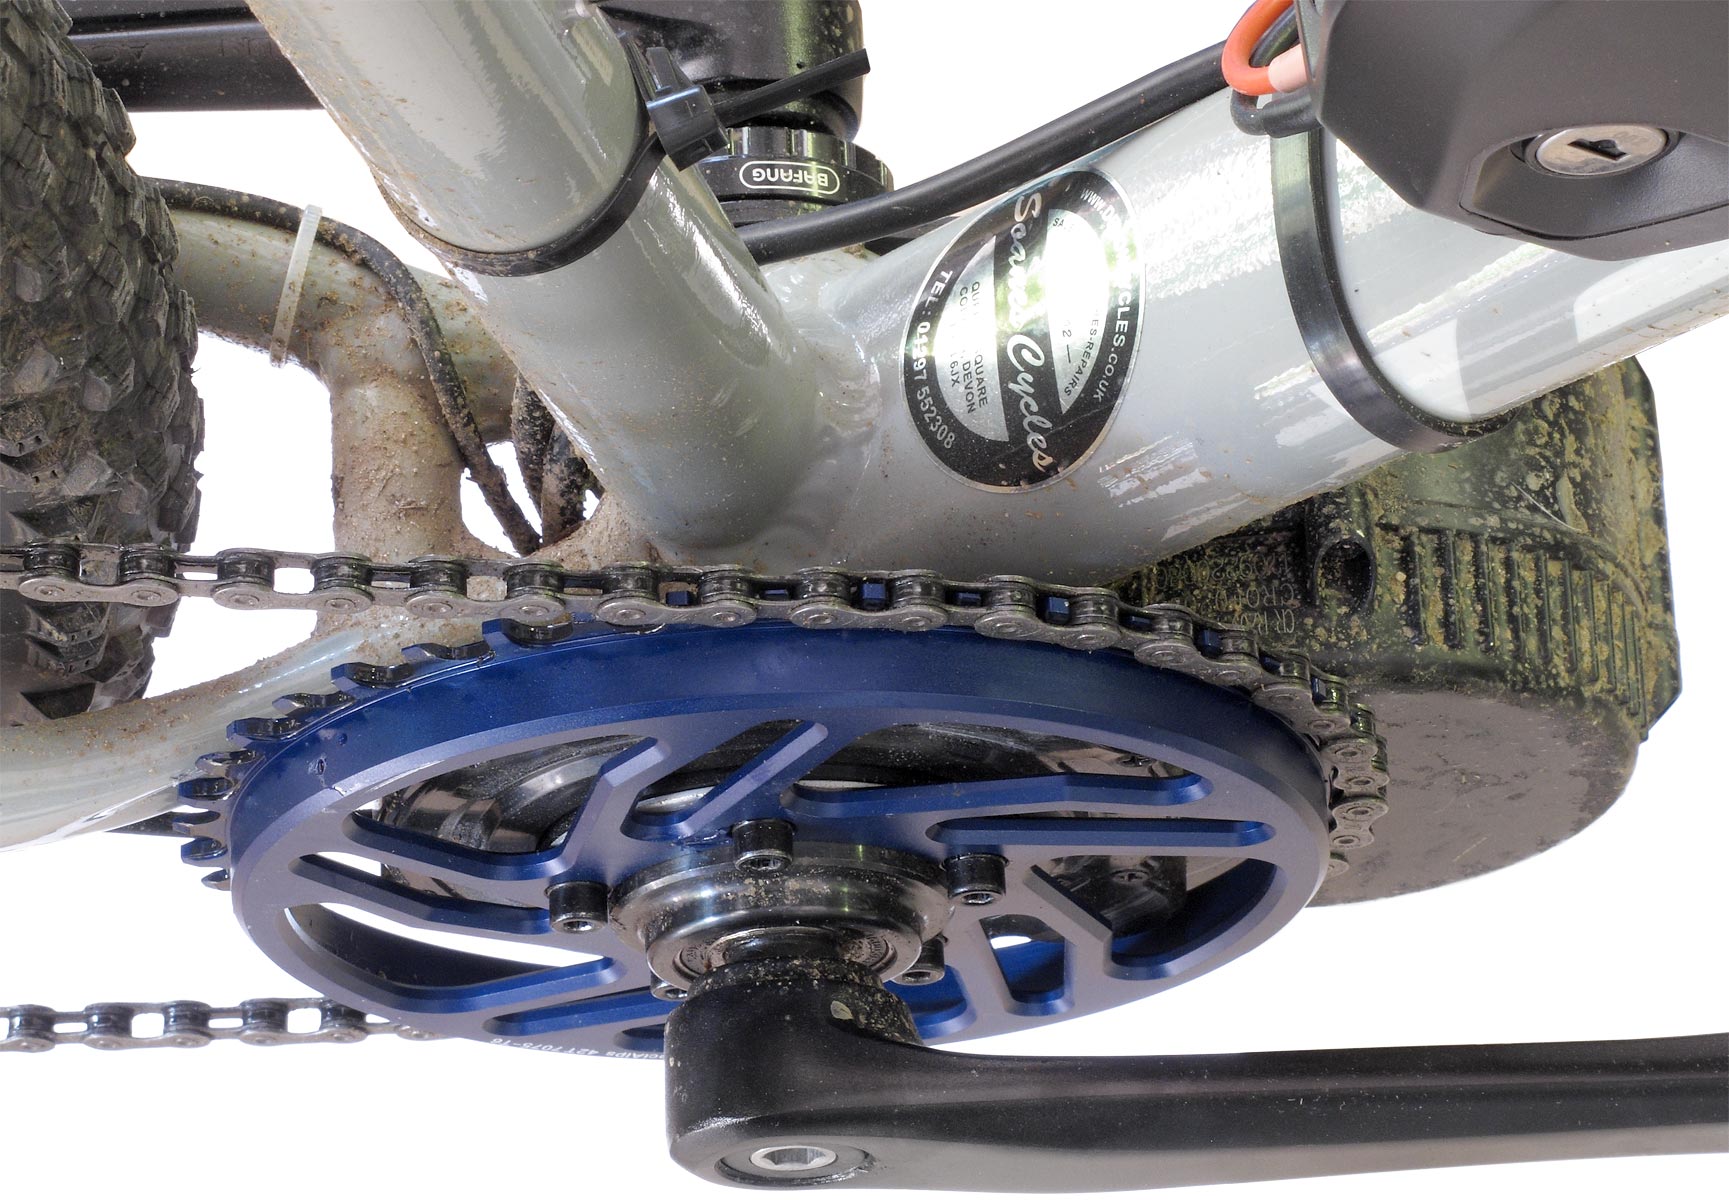
| The skirt of the PreciAlps chainwheel is deeper than that of the ones supplied by Bafang, and I when I bolted it directly on to the motor on the Sterndale I found that the teeth rubbed on the bike frame. To overcome that problem, I included one of the 0.9 mm spacers that I had made previously, as can be seen by careful inspection of the photograph above. It would be useful if manufacturers would recognise the importance of having such shims available, even if they are not always necessary. When I later fitted a PreciAlps 42T N-W to the Saracen 29", it did not need a spacer. |  |
As a test of 42T chainwheel on the 27.5" Sterndale, I rode up a hill out of Ottery St Mary known as the Chineway. This is on the Tour of Britain cycle route; and has an average gradient of 20% (1/5) for about 1 km, thereby providing one of the more challenging hills for the competitors. I found that I could get up the long 20% stretch at 5 mph (8 km/h) in bottom gear without any need for rest. The trick was to hold the hand throttle fully open and pedal moderately hard, but there was no great difficulty. I then turned right onto a road called 'Hemmings Lane', which becomes 'Coldharbour Lane' and then goes past my next-door neighbour's farm (where I can cut through). This has a section of about 50 m at the beginning, with a gradient of 25% (¼). There I did have to work hard, but there was no need to stand up in the pedals; and it was clear that the drivetrain configuration was good for some fairly challenging terrain.
The advantage of the hand throttle when ascending steep hills is not that the such hills would otherwise be impossible, but that the magnet on the rear-wheel must pass the sensor later than expected before the motor unit can determine that the rider needs extra assistance. Thus the throttle can tell the controller that maximum power is needed immediately, and there is then no delay while the system determines that the bike is nearly at a standstill in bottom gear. This shortcoming of systems not having a hand throttle is, of course, the reason why expensive commercial e-bike offerings have an additional sensor to inform the controller of the chosen gear ratio. Another solution would be to fit more magnets to the back-wheel spokes and change the speed-calculation algorithm accordingly.
(42T with 9sp 12-36T cassette, 29" wheels).
Once I had the Sterndale working well, I set about converting the Saracen 29. Although I was planning to fit an 11-speed rear dérailleur eventually; I got it going with the existing 12-36T 9-speed cassette and shifter in order to avoid implementing too many changes at once. I then went out riding on it, with my son Steve on the Sterndale as my companion.
As mentioned previously, a bike with 27.5" wheels has 5.4% mechanical advantage over one with 29" wheels. The drivetrains on our bikes were otherwise identical. Thus Steve had a small advantage over me, and I am, by far, the most frail. Still we were both able to ascend a 21% (1/4.8) gradient of about 200 m with some fairly hard pedaling but no great difficulty. I would, of course, have preferred not to have lost the mechanical advantage provided by the smaller wheels of the Sterndale; but being able to manage a 1/5 hill is probably an acceptable limit for many people.
Shimano
M8000 11-speed
drivetrain.(42T preci-alps with 11-46T casette, 29" wheels).
Modern bikes are moving to a single front chainwheel configuration as rear dérailleur designs improve. This development offers the possibility of both road and off-road capability just by moving the shift lever. To me, this seemed a little too good to be true; but my e-bike research could not have been complete without at least trying it. I therefore decided to fit a Shimano 11-46T Deore XT drivetrain to the Saracen 29 (the Sterndale 27.5 having, by that time, become my primary means of transport). Even wider-range options exist, but I was initially sceptical that such cassettes could be made to work without frequent critical adjustment, and the ratios given by the XT 11-46T covered a range I had already evaluated (by changing front chainwheels) and found to be adequate.
Shimano 11-speed 11-46T cassette with long-cage dérailleur. The drivetrain is shown in its lowest ratio setting, so that the tension pulley (lower) is at its furthest forward. The chain slack is just sufficient with 118 links. The supplied B adjustment screw is fully in, but there was no need to fit a longer one. The front chainwheel is a PreciAlps 42T narrow-wide.
In order to carry out the conversion I purchased the following parts:
 Shimano XT CS-M8000 11-46T 11-speed cassette.
Shimano XT RD-M8000 11-speeed dérailleur, Shadow
RD+ shift,
SGS (long cage).
Shimano XT SL-M8000 11-speed "RH" bar mount
shifter with visual display. KMC X11.93 11-speed
chain with 118 links. Reusable 11-speed
quick
links (the chain comes with a single-use link). Tools needed for
fitting were allen keys, Bowden cable cutters, and a
carpenter's scratch awl (i.e., a tapered spike) for opening-up
the cut end of the shifter cable
outer.
Shimano XT CS-M8000 11-46T 11-speed cassette.
Shimano XT RD-M8000 11-speeed dérailleur, Shadow
RD+ shift,
SGS (long cage).
Shimano XT SL-M8000 11-speed "RH" bar mount
shifter with visual display. KMC X11.93 11-speed
chain with 118 links. Reusable 11-speed
quick
links (the chain comes with a single-use link). Tools needed for
fitting were allen keys, Bowden cable cutters, and a
carpenter's scratch awl (i.e., a tapered spike) for opening-up
the cut end of the shifter cable
outer.The XT 11-speed cassette can be retro-fitted to an existing Shimano-type freewheel hub, and so it dropped straight onto the splines vacated by the previous 9-speed assembly. The tooth sequence is 11-13-15-17-19-21-24-28-32-37-46, giving an interval sequence of 2-2-2-2-2-3-4-4-5-9. The increasing interval is normal, the point being usually to maintain a crudely equal percentage difference, but in this case there is a very large jump from 37T to 46T.
The 11-speed shifter is the separate bar-mount type, allegedly for the right-hand handlebar, but it fitted perfectly well on the left and permitted a good control position relative to the brake lever. Furthermore, there are no numbers on the indicator, and the legends (Shimano, Deore XT, Dyna-Sys II) are orientated so that they are the right way up for the rider to read. Consequently, the control looks as though it should be on the left anyway, and the indicator moves from left to right on changing to a higher ratio.
The shifter came packaged with the cable inner already fitted, and a spare cable outer (including plastic frerrules) placed in the box. I particularly needed a new cable outer for this installation, because the old arrangement on the Saracen used frame lugs and had bare sections. A continuous run allows the cable to be routed away from the point on the top frame tube where a bike stand needs to be clamped during setting-up. I was advised by the supplier that I would have to purchase the outer separately, but that information was incorrect.
For the Shimano XT M8000 Shadow+ 11-speed rear dérailleur, it is not necessarily clear from the sales literature that it will work with an 11-46T cassette. Chain Reaction Cycles, from whom I bought the parts, however assured me that it would; and confirmed my surmise that I would need the long-cage version.. The dérailleur is provided with a chain stabiliser, this being a unidirectional friction-clutch mechanism that is intended to prevent wild oscillation of the chain and cage on rough ground. A switch is provided so that the clutch can be disabled during wheel changing, making the cage easier to move by hand.
The longest available 11-speed chain I could find had 118 links. This turned out to be just about right with a 42T front chainwheel, but I am not sure that anything significantly larger than that could have been accommodated. For the Saracen 29, the distance from the crank axis to the back-axle centre-line is 443 mm. For bikes with smaller wheels, this distance might be reduced, possibly allowing for a larger front or back sprocket; but other considerations dictate that the shortening of the bike will not be equal to the reduction in wheel radius. For the Sterndale 27.5", for example, the distance is 432 mm (11 mm shorter then the Saracen), whereas the reduction in radius is 19 mm.
Details of how to set up
the Shimano M8000 and M9000 dérailleurs is given in the Shimano
Rear Derailleur Dealer's Manual.Fully expecting that the setting-up process would be tricky, I was rather surprised by the ease of commissioning. Since I did not have a large-enough spoke guard for the cassette (the plastic disk that goes between the inner sprocket and the spokes), I set the lower limit (L) screw to align the jockey pulley centre line just slightly outboard of the large sprocket centre line (away from the spokes). This is actually standard procedure, but if there is a spoke guard, it can be tempting to tweak the L adjustment for best pick-up. Next I pulled the dérailleur out by hand and aligned the jockey centre line to the smallest sprocket centre line using the upper limit screw. After that, I fitted the chain and adjusted the B screw (end adjust bolt) to get clearance between the large sprocket and the jockey wheel in the lowest gear. I had to turn the B screw to be pretty-nearly fully in, but I did not need a longer one. Finally, I adjusted the cable tension by turning the barrel adjuster on the shifter (having already pulled the cable tight through the anchor point during assembly), to get correct chain alignment in the middle of the gear range.
To test what I had done, I ran the bike motor on the hand throttle while shifting up and down through the gears. I fully expected that I would need to carry out a lot of critical tweaking, but the system worked flawlessly from the outset, like no other dérailleur I had ever messed-with before. That might have been luck, of course; but I suspect that it might also be associated with the rather elaborate pick-up ramps machined into the face of the large sprocket. The unhesitant, serpent-like, climb from 37T to 46T is something to behold.
One feature that I could not get to work however was the friction clutch. I found that the forces involved in changing ratio under motor power on the bike stand would pull the whole assembly around on the dérailleur hanger and loosen the mounting screw. It is not advisable to tighten this screw excessively because it and its socket are both made from aluminium (the torque figure for Shimano is 8 - 10 Nm), and having the assembly come loose and jam-up while on the road would be disastrous. The solution was simply to leave the clutch in the 'off' position. No problms were experienced in many miles of cycling both on and off road.
For road testing, I went for a few short rides to check that everything was bolted-on correctly, and then set out in search of steep hills. The drivetrain, as might be expected by now, performed perfectly, and I found that hills that I had previously regarded as too steep, were now easy to tackle using the 46T gear. Thus I found I could manage a 25% gradient with a little pedalling but no real stress, and I could pull-away from standstill using the hand-throttle on a gradient of 20% (as was the case with the earlier unsatisfactory 32/36 flat front-chainwheel experiment). On a 33% road gradient of about 200m (going up Coldharbour lane towards the Chineway) I needed to pedal fairly hard, but I managed it at 4 mph without the need to get off or rest (you need good hiking boots just to walk up that particular hill). Overall, I would have preferred a smaller gap between the first and second gears, but this was not really a problem; and I could see the logic of having a 10-speed road set plus an extra low ratio.
Gear changes were so smooth that, if I backed off the power, there was often no audible indication that the shift had taken place. This was a little disconcerting at first, because I wanted to be sure that the dérailleur had operated correctly, but I quickly learned to verify shifting via the change in pedaling cadence.
A feature of the shifting mechanism that I found particularly helpful is that it allows for a downshift of up to 3 sprockets at a time, e.g., 11 to 8, 8 to 5, etc.. This allows the bike to be changed rapidly into low gear, often with only one front chainwheel rotation to complete a multiple shift. This is extremely useful for going from downhhill to flat, or from downhill to uphill, or for giving-way to inconsiderate motorists.
Having gained confidence that I could handle just about any paved surface that the Honiton Forest could put in my way, I kicked the bike off the road and headed up the Knightstone bridleway, which is located just under a km from my house. This heads up to a single-track road known as the Higher East Hill Strips, in the East Devon Area of Outstanding Natural Beauty (AONB). The terrain of the bridleway consists of rain gulleys, scree slopes, and paths covered in leaf-litter, some of it adjacent to some rather scary drop-offs. On the shortest route between the Middle Strips (where my house lies) and the Higher Strips, the gradient is variable between about 20% and 33%. To navigate it safely on the 'easy slopes', I often needed to put my feet on the ground, but I was perfectly able to do that by keeping the bike going on the throttle. In fact, my biggest worry was that going at about 5 mph was often too fast to allow me to choose the best course through wheel-ruts and gulleys. On the steeper scree slopes however, I decided not to risk bursting the tyres by having my weight on the saddle, and the solution was to get off and crack the throttle open a small amount; in which case the bike would drag me up the slope like some kind of demented walking frame.
Riding the upgraded Saracen both on and off road was, of couse, enormous fun; and it quickly dawned on me that it had given me the freedom to go just about anywhere. It is perhaps not the case that everyone will need such extreme versatility, but it is surely worth knowing that modern engineering permits it.
A point that struck me incidentally, is that, while dérailleur sets with chainwheels larger than 46T are available, there would be little point in having one on a 29" e-bike with a 42T front sprocket (and a 27.5" wheeled bike would need it even less). It is therefore perhaps the case that a larger rear sprocket is only worth considering if you have a front sprocket with more than 42 teeth. These considerations, of course, do not necessarily apply to pedal-powered mountain bikes configured for serious off-road use.
Sunrace MS8 EAZ 11-46T 11-speed cassette.
(42T preci-alps with 11-46T casette, 27.5" wheels).
For the Sterndale 27.5", the axial distance from the back wheel to the crank is 432 mm (slightly less than the Saracen's 443mm). This measurement indicates that the Sterndale with a PreciAlps 42T will also work with a 46T cassette and an XT M8000 11-speed mechanism. I therefore bought another dérailleur, shifter, and chain, the same as for the Saracen 29, but this time I opted for the Sunrace MS8 EAZ 11-46T cassette. The EAZ sprocket sequence is 11-13-15-18-21-24-28-32-36-40-46. This gives an interval sequence of 2-2-3-3-3-4-4-4-4-6, which is much more evenly spaced than that of the Shimano 11-46T. Sunrace also make an 11-50T cassette, MX80 EA5; but my experience (see above) seemed to suggest that a 46T bottom gear would be adequate for an e-bike, and although Sunrace cassettes are Shimano compatible, there was the possibility of difficulties in setting-up with a 9% larger cassette.
More as and when matters arise. . . . . . .
 DWK
2018 - 2020
DWK
2018 - 2020 
Suppliers:
Note that an M-Drive kit does not usually include a battery; the latter being sold separately because there are choices of capacity. The Bafang BBS01 and clones are sold with a thumb throttle, usually said to be for off-road use only, but see the Twist & Go type approval exemption info above. There are also ½-twist throttles available for those who are used to riding a motorcycle. Some motorcycle throttles have an adjustable friction pad, to allow hand signals with power on, but an e-bike throttle should spring-back when released.
Classified on the website under > Parts > Electric Motors.
 Bafang uses Higo Mini B series connectors
between the motor unit and the console and various controls. For info
and purchase of additional connectors see: PreciAlps,
France. Mid drive parts and accessories, lightweight
(T6-7075)
chainwheels and
spiders for the BBS01/02. 42T is
the smallest possible front sprocket size that allows the optimum
chainline
(i.e., a dished chainwheel). PreciAlps front chainwheels use the
narrow-wide tooth profile. The company also makes a 42T extension
sprocket.
Bafang uses Higo Mini B series connectors
between the motor unit and the console and various controls. For info
and purchase of additional connectors see: PreciAlps,
France. Mid drive parts and accessories, lightweight
(T6-7075)
chainwheels and
spiders for the BBS01/02. 42T is
the smallest possible front sprocket size that allows the optimum
chainline
(i.e., a dished chainwheel). PreciAlps front chainwheels use the
narrow-wide tooth profile. The company also makes a 42T extension
sprocket. Note that chainwheels for
the BBSHD (1 kW) M-drive do
not fit the BBS01/02. The sprockets look similar
in photographs, but the ones for the high-power drive are smaller and
have a smaller BCD for the 5 mounting holes. RisunMotor
(Shanghai). FasterBikes.eu
, Bafang BBS01 / 02 chain ring spacer (2 mm). Allight chainwheels
for the Bafang BBS01/02, Al 6082, 34 - 70 teeth, 60 mm BCD. Available
from Duch
Bike Bits. Chain Reaction Cycles.
Belfast (UK). Knowledgeable staff and a huge range of bikes and parts.
Note that chainwheels for
the BBSHD (1 kW) M-drive do
not fit the BBS01/02. The sprockets look similar
in photographs, but the ones for the high-power drive are smaller and
have a smaller BCD for the 5 mounting holes. RisunMotor
(Shanghai). FasterBikes.eu
, Bafang BBS01 / 02 chain ring spacer (2 mm). Allight chainwheels
for the Bafang BBS01/02, Al 6082, 34 - 70 teeth, 60 mm BCD. Available
from Duch
Bike Bits. Chain Reaction Cycles.
Belfast (UK). Knowledgeable staff and a huge range of bikes and parts.Devon Bike Shops:
Information and review:
Manuals are available from most of the conversion kit suppliers (see above). Some are better than others. Read them.
The reviewer lives in Bath, and needs to climb Lansdown Hill every day to get home from his office. He finds that the supplied 48T chainwheel far too big when used with his 11-28 cassette and suggests that the ideal chainwheel size for his bike would be in the 34 - 42T range. It depends on the rear dérailleur ratios and the wheel diameter of course, but commentators seem to agree that 48T gives self-powered top speeds that you just don't need (~50 km/h / 31 mph), and this should be traded for torque at the bottom end.
Discussion of powered wheel and friction drive options, plus review of the Panda M-Drive and its installation process. Notes some derailing problems due to poor chain line. Also finds 48T to give too high a top gear (with an 11T rear), and suggests that 45T would be better (note that Bafang makes a 44T chainwheel for the 8Fun). You can still get up a 1/10 hill fairly easily with the 48T front sprocket, but the ability to manage very steep hills will be improved with a smaller one.
The Revos seems popular on heart forums, probably because it is very easy to install. Drive is provided by a roller that presses against the back tyre and can be retracted with a hex key. There is no twist-&-go facility, and a version with a 209 Wh (5.8 Ah) battery costs about the same as a Bafang BBS01 with a 560 Wh (15.6 Ah) battery. It cannot offer the power and range available from a Bafang or a hub drive, and it does not solve the kind of problems that heart patients are likely to have, i.e., frailty, low cardiac output, and the occasional need to get home without pedaling.
Accessories
Handlebars:
Using something like an Alpkit Confucius Hoop handlebar is an excellent way of adding extra accessories (smartphone / GPS holder, action camera, headlight) once the e-bike conversion has used up all of the handlebar space. The Alpkit bar was the author's choice in 2018, then it was discontinued for a while, and now (2020) it seems to be available again. An alternative is one of the Jones H-Bar designs (of which the Alpkit Hoop is actually a modified copy). These are angled differently to a traditional bar, but people seem to find them comfortable to use.
The Alpkit bar is made from compass friendly 6061 aluminium. The Jones bars are also made from non-magnetic materials (aluminium or titanium). Steels are much heavier, and so less desirable, but stainless grades A2 (304) and A4 (316) are usually austenitic (non-magnetic). If in doubt, and you want to mount a compass, check with a magnet.
 |
Inclinometer
(handlebar mounted). A measure of the gradient on which the bike can pull away under its own power is useful when experimenting with sprocket ratios. This Sun CyclClimb inclinometer consists of steel ball in a curved tube filled with viscous liquid, and has scales in gradient % and degrees. - Simple and effective, but you must remember to calibrate it on a level surface before setting out (a modification to prevent it from being knocked out of calibration is needed). |
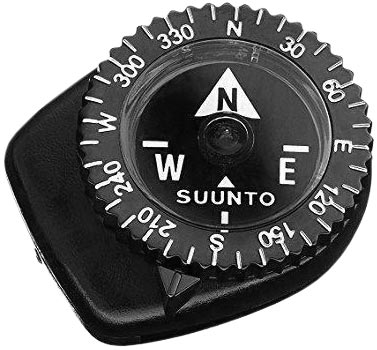 |
For those used to orientation using old-fashioned magnetic North, a small compass such as the Suunto Clipper (shown) can be attached to the bike handlebars. The compass is designed to fit onto the strap of a watch, diving knife, or dive computer; but a tie-wrap will fix it to a bike perfectly well. The handlebars should, of course, be non-ferrous, and there must be no brake actuator or other magnets in the vicinity. |
Tools
and consumables:If you're happy to do the installation yourself, chances are you'll already have many general workshop tools at your disposal (i.e., socket set, spanners, adjustable wrench, copper or plastic mallet, G-clamp, bench grinder, Allen keys, screwdrivers, easing oil, Loctite blue, cable ties, etc.). You'll probably also have a set of tyre levers. In that case, the following additional tools will provide the capability to do general bike servicing. You probably won't need all of them for an M-drive conversion; but if you're going to start comprehensively dismantling bikes and messing around with sprocket ratios, it's best to be equipped for any eventuality.
The individual items are not expensive, and you can get most of them on ebay (if you search for these items online, put "bike" into the search term). Note that some of the tools shown below are for the amateur market, and will not necessarily survive heavy industrial use; but they should do the job if applied correctly and not subjected to excessive force.
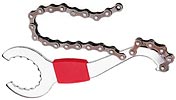 |
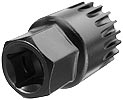
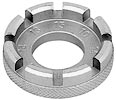
Multi-purpose
chain wrench (sprocket wrench with hook wrench and
splined-nut wrench). The spline wrench fits the Bafang outer aluminium M33 bottom bracket nut. The chain wrench is used for holding the rear sprocket cassette still while undoing the retaining nut. |
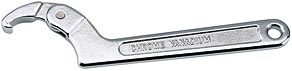 |
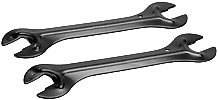
C-spanner (hook
wrench). 19 - 51mm size is required for the Bafang M33×1.5 bottom bracket castle nut. A cheap multi-purpose wrench is not good enough for the job. |
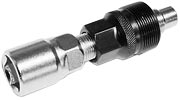 |
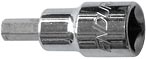
Crank
puller (for removing pedals). The basic tool is used for square taper spindles. Shimano Octalink (8 spline) and Isis (10 spline) crank arms require an additional anvil piece that fits into the end of the shaft (see below). |
 |
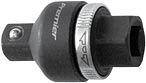
Octalink / Isis adapter.
For removing splined cranks when using a puller designed for square taper cranks. Left: magnetic type, snaps onto the end of the puller; Right: Shimano TL-FC15. |
 |
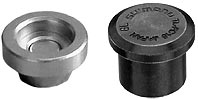
Bottom
bracket disassembly tool (20 spline). The
chainwheel side bottom bracket retainer nut has a left-hand thread.
To loosen the nut, hold the tool in place with a G-clamp,
with a piece of wood to protect the paint on the other side of the
bracket. A sharp (but not particularly hard) tap on the
wrench with a soft mallet should get the nut turning. |
 |
Cone spanners. Used for adjusting the end-play of tapered axle bearings. |
 |
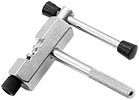
Sprocket cassette
removal tool.
Used for detaching the cassette hub (Shimano / SRAM type shown). Needed if you want to replace worn cogs or change the rear dérailleur ratios. The outer nut fits into a 24mm or 15/16" socket wrench. |
 |
Chain rivet extractor.
A general necessity in any bike toolkit. Needed for removing the front dérailleur if no quick-link is fitted. Needed for shortening chains, etc. |
 |
Quick link.
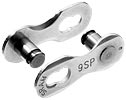
Convenient for rejoining chains, and more reliable than the practice of pushing pins back in. Make sure you get the right width for your rear cassette (8, 9, 10, 11 speed, etc.). Also get the re-usable rather than the single-use type. |
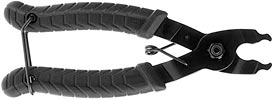 |
Quick link pliers. Some quick-link pliers can only open the link (i.e., pull the rollers together). You might as well get one that can also close it (i.e., pull rollers apart), although a sharp tug on the chain works just as well. |
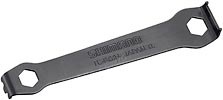 |
Chainring nut wrench
(peg spanner).
For tightening the fasteners that attach the front chainring to the spider. This one (Shimano TL-FC21) also has a crank cap remover and 9 and 10 mm wrenches. |
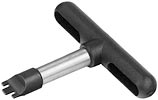 |
T-handled chainring nut wrench.
Allows more torque than the flat peg spanner, but can only be used when the chainwheel is off the bike. |
 |
Spoke
wrench / spoke key (for 10 - 15 gauge spoke nipples). Not needed for M-Drive conversion, but used for general wheel tuning. |
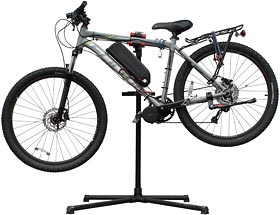 |
Bike servicing stand (30
kg rated) Once you have fitted the Bafang display to the handlebars, you can no longer turn the bike upside down for servicing. A stand is also convenient for making electrical measurements and setting up the dérailleur (etc.). A 30 kg rated bike stand can be had for about £25. |
Torque
wrench (0-300
Nm) |
|
 |
8mm
Allen key bit socket (½" square drive) For tightening the pedal crank bolts (socket sets often include this item). |
 |
Ratchet Adaptor
(i.e., Ratchet Adapter). Converts a torque wrench or breaker bar into a ratchet drive. The amount of torque that can be transmitted must be stated by the manufacturer (if it isn't, you don't want it). The Sealey AK737 ½" square drive (shown) withstands up to 512 nM. The Sealey AK7371 ¾" drive can withstand up to 1412 Nm. |
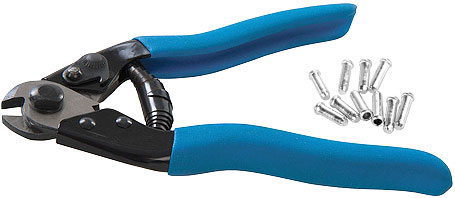 |
Steel wire / bike cable cutter. This is not the same as en electricians wire cutter (which will mash the cable and be destroyed by the extremely hard steel used in Bowden cables). The Silverline model shown comes with an initial supply of ferrules, which fit over any protruding cable inners and help to prevent injuries from the sharp ends. |
 |
Carpenter's scratch awl. A tapered spike such as a scratch awl is ideal for opening-out the cut ends of Bowden cable outers. The item shown is made by JAK Tools, and has a good long taper. Some engineer's scribers are also suitable. |
 Scale divisions in mm |
This quartz shard, about 8.5 mm in length managed to insert itself point-first into the rear tyre of the Sterndale. The bike was wheeled home, and the puncture in the inner tube located. Then the tyre was carefully searched for penetrating objects in the vicinity of the puncture. The problem here is that the tyre moves relative to the inner tube while the bike is being pushed. Hence the shard was not found immediately and caused two more punctures before it was finally located. A throrugh search of the tyre surface is evidently a good idea when fixing punctures. |
 Disraeli Gears:
Throughout this article, the ratio changing mechanism has been referred to as a 'dérailleur'. You don't need the acute accent in English, but it is nice to remember that the device was popularised by the French cycling enthusiast, inventor and journalist Paul de Vivie. There is, nowadays, a tendency to refer to it as a 'derailer'; but a derailer is a terrorist who sneaks onto railway lines in the dead of night and drags blocks of concrete into the track. Derailers are horrid, whereas dérailleurs have helped to make cycling into an effective and affordable form of transport.
In 1967, the band Cream brought out an album called "Disraeli Gears". This, of course, is a humorous malapropism on 'dérailleur gears', which was voiced by roadie Mick Turner when Eric Clapton talked about getting a racing bike (see: wikipedia, Disraeli Gears). DWK was 15 years old at the time, riding to school on an ancient bike with a 3-speed Sturmey-Archer hub. The kids with richer parents however were beginning to turn up with new bikes having dérailleurs, and after the Cream album release, these were generally known as Disraeli Gears. So, if you don't like the French word, there's another popular alternative.
|
E-bike conversion |
E-bike Legal |
E-bike battery |
E-bike electrics |
Side stand |
Steering damper |
Electric m/c |
©
DW Knight, 2018 - 2020.
Updated: 26th Nov. 2020. 6th Jun 2021.
Updated: 26th Nov. 2020. 6th Jun 2021.